Gluten Free Homemade Croissants!

Dear reader or fellow gluten-free lifestyler,
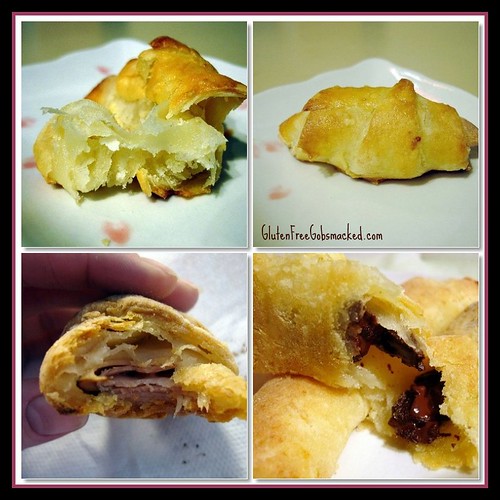
Do you know what I ate two nights ago for the first time in eight years? Something so delicious and delectable that I practically made myself ill because I couldn’t resist and I ate THREE of them! I’m talking about homemade gluten-free chocolate-filled Croissants. Yeap. Catch you breath. I said the magic word – CROISSANT and GLUTEN FREE in the same sentence.
Last December, I was emailed a recipe that I just wrote about for Crescent Rolls. I had been wondering for VERY long time how I could make croissants to eat with my morning latte filled with chocolate (or not) or fill with turkey and cheese or whatnot for lunches. Typical croissant recipes require yeast, milk, the gluten of flour to create the flaky layers, and resting/rising time that most gluten free recipes cannot duplicate. However, with super slight modifications from the recipe I posted for crescent rolls, I have been able to make croissants the last few nights that I have been enjoying for breakfast and lunch.
It is a welcome change of pace for my taste buds.
The beauty is that this same technique (the rolling, turning, frozen grated butter) that has made the most tender and flaky pastry can also be used for filo dough. In fact, I have a little part of my mind planning to make some more baklava this weekend – oh babee! I’ve made baklava before following Rebecca Reilly’s recipes (Delish, by the way. This is a cookbook to own if you like to bake and also have to bake gluten-free. However, I was truly missing the flaky and tender pieces of filo dough that you normally have in baklava. I was curious about whether this dough would work for that – but was only convinced after my can-eat-gluten-but-doesn’t husband gobbled up a couple mini-croissants and exclaimed “Wow, Katie, you could make the best filo dough and baklava with this stuff.” Done. That’s *so* next on this baker’s agenda.
In the meantime, if you have some time on your hands and plenty of butter on hand, please make some croissants! You won’t regret it, I promise. You can fill them with whatever your heart desire. And trust me, you will want more of these buttery, flaky, tender croissants. I wish I could tell you what they are like on Day Three, but the ones I’ve made have yet to make it past Day Two!
In fact, for the first time ever, I’m rather bummed that my colleagues aren’t wondering what I’m eating for lunch because it looks so “normal” to them. It surprised my last night when that thought crossed my mind. Then I realized, they are usually curious about what I’m eating because they haven’t often seen quinoa salads or eaten homemade risotto or rice balls with smoked salmon. For once, when I want them to jump up and down with me on the desks at lunch, they are painfully unaware of my triumphant, scrumptious lunch. Meh. It’s for the better. They would all just want a bite anyway. LOL
My lunch today includes a croissant filled with turkey/white cheddar and one filled with broccoli/white cheddar cheese. I’m in heaven, don’t ya know. In fact, breakfast? Yeap. A croissant dunked into my coffee. Man, I’m bad! I have definitely had my butter intake for the next – oh – month or so, lol. But that’s okay. I am enjoying exploring the kitchen again.
This recipe takes time to prepare (more like time to roll out repeatedly and refrigerate), but after reviewing many gluten recipes for croissants over the last several years, the time is actually less involved than for traditional croissants.
I’m not good at rolling them up to look perfect, and have decided to stick with the mass-rolling technique of keeping them straight. Or, in the case of the ones filled with cheesy goodness or chocolate, I actually rolled them up a bit more like an egg roll + crescent to keep the filling within the croissant and not all over the baking pan. You can even seal in the goodness by filling, rolling over one flap over the top of the filling and brushing the edge with some beaten egg and folding up a *bit* (like 1/4″). Once you’ve done that, you can roll it like a crescent/croissant.
I do hope you try this recipe, please tell me if do! I’d love for us to keep this one on the exploration front – it’s worth it! Here are the basic steps I followed. Keep in mind that the croissants will NOT puff up/rise (there’s no yeast here) nor will they be as large as the ones you see at the market.
First, prepare batch of the crescent dough with the modifications I used plus a few others. I have retyped the recipe here because I have added a bit more of a few ingredients like cream of tartar, xanthan gum, baking soda, sugar and an additional flour (sweet rice flour).
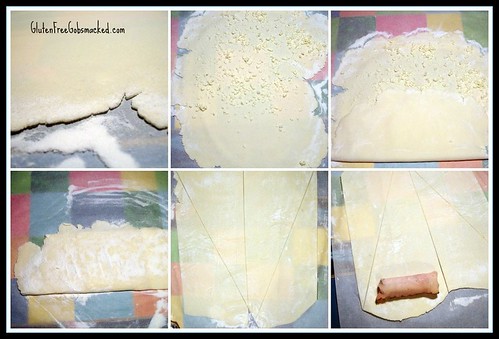
I have also uploaded pictures of the steps (rolling) for you if they will help as well. Although, let me just say this, photography + massive amounts of sweet rice flour….. well, they just don’t always mix. LOL
Here’s the overall step-by-step picture. You can find details that explain each image on Flickr too. Just click on the big picture and it will take you to the Flickr page where you can read more.
GF Croissants
Recipe makes 14 small-medium croissants.
Ingredients:
1 stick of butter, (8 Tablespoons) slightly softened
1 stick of butter, frozen
1/3 cup + 1 Tablespoon GF cottage cheese
1/3 cup + 1 Tablespoon GF cream cheese
1 cup GF Flour Mix (rice-based or sorghum-based)
2 Tablespoons of sweet rice flour + 1 ½ cups sweet rice flour for rolling
1 ½ teaspoons xanthan gum
½ teaspoon salt
¾ teaspoon cream of tartar
¾ teaspoon baking soda
1 ½ Tablespoons sugar
1 or 2 eggs, beaten (to seal the croissants closed and brush on the croissants before baking)
Directions:
- Cream together softened butter, cream cheese, and cottage cheese until whipped, creamy and semi-yellow in color (about 3-4 minutes)
- Add GF Flour mix, 2 Tablespoons sweet rice flour, xanthan gum, salt, cream of tartar, baking soda and sugar. Mix together until the dough comes together – mostly away from the sides and begins to form a ball or lump in the middle of the mixer (about 3-4 minutes).
- Shape into a disk and place into a Ziploc bag. Refrigerate at least two hours, overnight preferred.
- Grate the frozen butter (I used my food processor) and put it into a freezer-safe storage container/bag. Return grated butter to the freezer until you are ready to use. (By the way, it will store indefinitely like this.)
- Work in a cool place or consider refrigerating the dough after Step 9). Place parchment paper, sweet rice, grated frozen butter, and the rolling pin on a large surface that you can easily reach to roll the dough thinly.
- Remove dough from the fridge and divide into fourths. Return 3 of the 4 to the Ziploc bag and place in the refrigerator.
- Reshape this ¼ piece into a disk quickly. (Try to touch the dough as little as possible in order to keep it as cold/cool as possible.)
- Generously dust the top of the parchment paper. Place the dough disk into the center on a generous amount of sweet rice flour. Generous dust the top and side of the dough. Cover with another piece of floured parchment paper. Roll the dough as thinly as possible (about 1/8 of an inch or so). You should be able to see through the dough partially. I was able to roll the dough about 22” long and about 15” wide.
- Turn the dough lengthwise. Generously sprinkle the middle 1/3 of the dough with the grated, still-frozen butter. Fold up the bottom third of the pastry over the top of the middle third. Sprinkle the grated, still-frozen butter over the top of the part you just folded on top. Fold down the top third of the dough to cover the center/butter again.
- Turn the dough and fold in any edges that are thin or not part of the folded center. Generously dust the top, sides, and bottom (lift the dough gently to push flour underneath) of the dough. Repeat the rolling and butter sprinkling (Steps 8 and 9) one more time. You will sprinkle the butter on twice and roll out three times.
- After the second sprinkling of butter and folding, turn the dough again and roll the dough out for it’s final time, once again rolling it as thinly as possible. Work quickly at this point as the dough is beginning to warm up again.
- Lift off the top parchment paper and divide the dough in half with a pizza cutter. Leave the dough lying flat along the parchment paper.
- Divide each half into long triangles with the pizza cutter. You will end up with 4 large triangles for each ¼ of the dough. At this point you may fill your croissants with pieces of dark chocolate or turkey/cheese, etc by placing your filling on the wide end of the triangle.
- Roll the croissant up from the wide end carefully (as the layers are thin). Seal the end (to keep it together during baking) by brushing beaten egg onto top ½ inch before finishing the roll. Shape into a crescent moon shape or leave in a roll.
- Brush the completed croissants with beaten egg (this provides them with a golden brown or they will turn a dark brown while baking).
- Lay the complete croissants on parchment paper and refrigerate until you are ready to bake. Repeat steps 7 through 15 with the remaining dough. OR bake the first batch, see what you need to adjust and then bake the others. The dough will keep refrigerated for two days.
- Bake the croissants at 375F for 18-22 minutes or until golden brown.
Enjoy!
-Kate