Gluten-Free Staples: What do you have in your cupboards?
When I was diagnosed, we lived in a funky apartment in Chicago. It was in a brown stone in Wrigleyville. The building had obviously been a single family home that had once been converted into three flats. And then the flats had been divided in half and six apartments were born. Thus my funky apartment had a kitchen actually larger than one of the bedrooms. It was a weird layout. My favorite part of it was the fact that in addition to the awesome kitchen space, there was a walk in pantry.
A walk in pantry which had been filled to the brim with glorious gluten-filled food stuffs. All of which need to find new homes when I learned I couldn’t eat them any more. The unopened items were all donated to the food shelter. The opened ones either hit the trash or were given to close friends. A few were saved and eaten by my love.
And then the restructuring of the pantry began.
Are you in the process of restructuring your pantry? Well then, this post is for you.
- First things first. Don’t worry if it feels like a slow process. It is. It *has* to start slowly. Not only are the ingredients more expensive than what you may have been purchasing, but they also work differently.
- Only buy the basics that you will use. Build from there. Check out a few recipes you want to try, on blogs, at the library, at the bookstore or from your GI’s office or local support group. What are the basic flours they use? Some people find it easier to begin with – or even stick with – using a flour mix (like “Pamela’s” or Bob’s Red Mill GF Mix – Two general, and widely known, gluten-free flour mixes).
- Pick up some basic cookbooks -but be warned: as with any cookbook, they depend greatly on your cooking knowledge and comfort. Many gluten-free cookbooks highlight basic recipes that are gluten-free and others cater to people who are more adventurous or experienced in baking. Cooking gluten free is easier to learn than baking gluten free. (See note above about flours.)
- Read a lot! Read gluten-free blogs (just check the links on this site to start with) …and websites (celiac.com, celiac.net, celiacdisease.net, etc) …and forums (Delphi) …and discussion groups (Silly Yaks Group on Yahoo)…. and magazines (Living Without, Gluten Free Living). It’s the best way to stay in touch with the gluten free diet, changes, products, medical research, dietary guidelines, etc.
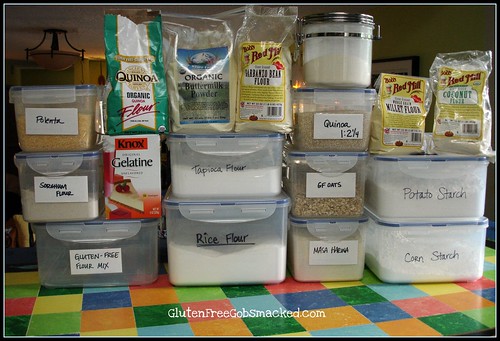
And What do we have in our pantry now? Well, a lot!
I sometimes think that each diagnosis of Celiac or Gluten-Intolerance should come with a gift certificate for a kitchen renovation. Mine is seriously lacking in storage space to begin with…and then enter the Gluten-Free baker? Oh yea. It’s a tight fit around here.
Basic Starches: There are three basic starches used in the majority of gluten free cooking. While there are more gluten free starches (like arrowroot), I have only included the ones I have used the most frequently. Hands down, I prefer to work with Tapioca Starch for most of my gluten-free baking needs.
- Cornstarch
Called corn flour in Europe. Not to be confused with American corn flour used for corn bread or tamales, etc.
Has a relatively neutral flavor for most people
Lightens heavy textures and creates a smooth crisp crust
- Potato Starch
Sometimes called Potato Starch Flour. It is NOT the same as potato flour.
Has a sweet, strong potato flavor
Creats a moist crumb, lightens heavy textures
- Tapioca Starch
Sometimes called Tapioca Starch Flour or Manioc Flour
Slightly sweet flavor
Creates a chewy, slightly springy texture and a crisp smooth crust
Basic Flours:
If you are a visual person, this is a great page to look at. It has photos of many of the flours so you can compare and contrast what they look like.
I actually have several flours on hand at any given time. But I began with basic rice flour. Sorghum (or Jowar) flour was not as widely available even 8 years ago, but now it is another staple. My top four flours are sorghum, rice, sweet rice, and millet. For other things I love to use coconut flour, almond flour, teff flour, quinoa flour, buckwheat flour, etc. I actually find it enjoyable to try out the new flavors available to us. I consider it a “perk”, if you will. Who knows if I would have been so adventurous had I not been diagnosed with Celiac Sprue.
- Rice Flour
Available as Brown rice flour, White rice flour, or Superfine (finely ground) rice flour.
People have found the superfine rice flour to create lighter goods with a less dense texture than typical rice flour based baked goods.
Creates a dry, fine crumb with a soft crust
- Sorghum Flour
Also called Jowar Flour
Has a slightly sweet flavor.
Creates baked goods with a fine crumb and a crisp crust.
- Sweet Rice Flour
Also called “Glutinous rice flour” or Mochi flour. (It is gluten free.)
Ground from a different type of rice than the regular rice flour, this is still gluten free
It can be used as a starch (for thickening) or as part of a flour combination (for cakes, dumplings, etc)
Slightly sweet in flavor.
Creates a tender crumb
- Millet Flour
Mildly sweet when fresh to slightly bitter if old.
Creates a dry, delicate crumb and a smooth thin crust.
I have pages and pages of more information for the other flours and starches I use. I thought maybe this would be a great place to start. There are a few other posts from others that you may find helpful as well.
Check out these posts as you begin your gluten-free journey as well.
- Gluten Free Mommy’s: Gluten Free Flours 101
This post is amazing – great details, photos and very thorough. I only WISH I were this organized!
I hope this helps someone get a start on this lifestyle. It really is an adventure.
If you are looking for more information about the texture, crumb, etc of a particular flour, please just ask or leave a comment. I would love to know how to better develop this post and resource.
-Kate
PS. I’ve gotten a couple emails asking about the containers I use. I used to have a mishmash of containers of different shapes – which made storage a mess! I recently purchased a bunch of Lock & Lock airtight containers. These have worked GREAT. In fact, I’ve even had one fly out of my hands and crash into the flour… WITHOUT it opening! Oh man! It would have been a HUGE mess (it was a tub of tapioca starch) to clean up. The ones that I bought have locking tabs on all four sides – which is why, I’m sure, it didn’t open. While I have linked to the ones available on Amazon, you can often find them at larger Asian markets in urban areas for relatively the same price and sometimes MUCH cheaper on sale.