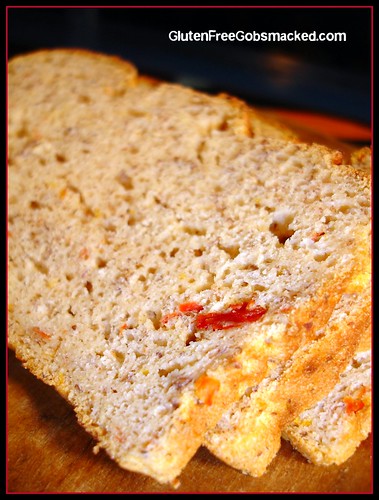
Gluten-Free: Sun-dried Tomato Sandwich Bread
On Sunday afternoon, I made this great sandwich bread. I tend to make bread on Sundays so that I can have sandwiches for lunch the first few days of the week. It makes for an easy lunch to pack and quite honestly, I really enjoy a good sandwich. Maybe that is what I missed the most – being able to stop at Costello’s (a local grinder shop near where we lived in Chicago) for sandwiches. I would often stop there on my way home from my grad classes which kept me on campus until 9PM after a long day of teaching.
While out shopping this weekend, I found a vacuum pack of sun-dried tomatoes. After missing the sun, thanks to our Pacific Northwest winter days, I thought a little sun-kissed goodness would be in order. (If you can’t find the vacuum-packed ones, don’t worry! While I made this recipe with sun-dried tomatoes that were not packed in oil, you can easily make this recipe with the oil packed kind as well.)
Last night, my love wanted sandwiches for dinner. Normally 3-4 days after making bread, I know that I should probably make grilled sandwiches or at least toasted ones. I didn’t need to do that with this bread, though. After 4 days, I am enjoying the last of my sun-dried tomato bread and it is STILL moist and fabulous.
In fact, my husband (who eats gluten-free with me) remarked how moist his bread was last night too. He even asked for seconds. And if you ask me, when a someone who doesn’t *have* to be gluten-free asks for seconds, you pay attention.
Today I have the last two slices for my sandwich at lunch. I’ve had a sandwich everyday this week which is unheard of! Usually, by the end of the week, I am the leftover queen. And to be honest, I don’t mind the leftovers at all. My love is an amazing cook and we have fun coming up with new recipes and ideas together. I’d rather be eating my leftovers than some of the other options or previous (pre-GF) choices (like the school cafeteria!).
But oh it’s so nice to have a week of sandwiches again. 😉
Here are a few recipe thoughts and tips:
- I made this recipe with the 1.5 pound bread pans (10″ x 5″). (You can find some here.) But this recipe is really a better fit (and would make a taller loaf) in a regular bread pan – so no worries. I just grabbed the first one in the cupboard and the larger one was there because I had just made some Millet andQuinoa Bread. (Go Natalie!).
- Let the bread rise in the pre-warmed oven, but be sure to turn the oven off. I tend to turn the oven to warm while mixing the ingredients and then turn it off while the bread is in the final 5-minute mix. That way the top of the bread will not begin to bake or dry out.
- When the rising time has finished, don’t bother taking the bread out. Just turn the oven up to the baking temperature and bake from there. It you are worried about it, be sure to check back at the half-way point. If the bread is browning faster than you would like, cover the top with aluminum foil to slow the browning down.
- Bread storage: I know some people slice and freeze their gluten-free bread. Since I don’t make a lot of bread (usually only what we will consume in a week), I do not slice it until I need to. I store my bread (unsliced) in an airtight Ziploc (with the air squished out) on the kitchen counter. This method keeps the bread perfectly fine for the week. With this loaf, even after 5 days of being stored like this it is still perfectly moist and chewy.
And now the recipe:
Gluten-Free Sun-Dried Tomato Sandwich Bread
Ingredients:
1/4 cup buttermilk powder
3/4 cup millet flour
1/2 cup sorghum flour
1/4 cup tapioca starch
1/4 cup cornstarch
1/4 cup flaxseed meal
3 teaspoons xanthan gum
1 Tablespoon yeast
2 Tablespoons agave nectar (or honey)
1 cup warm water
2 eggs
1/4 cup finely chopped sun-dried tomato
1 Tablespoon olive oil (omit if using sun-dried tomatoes packed in oil)
1 1/2 teaspoons cider vinegar
Directions:
- Preheat the oven to warm (200F).
- In a deep bowl (enough for 2 cups+ of liquid), proof the yeast in the cup of warm water and 2 Tablespoons of agave nectar (or honey).
- Blend together dry ingredients with a whisk or in the mixing bowl of your mixer.
- Once the yeast has gotten foamy (about 5 minutes), add the eggs, oil and cider vinegar to the mixture and whisk together to break apart eggs and blend the liquid ingredients evenly.
- Pour the liquids into the dry ingredients and mix together a low-medium speed for 2 minutes.
- Turn off the oven but leave it closed.
- Turn the mixer to high and beat together for 5 minutes.
- While the bread is mixing, spray the bottom (and a little of the sides) of your bread pan with olive oil/cooking spray.
- Pour the bread mixture into the prepared pans and even it out.
- Slide the bread pan into the warm oven to rise for 45 minutes.
- Turn the oven to 350F and bake for 30-40 minutes or until a skewer inserted into the middle comes out clean and/or a temperature of 190F is reached.
- Turn out on to a cooling rack and allow to cool mostly before slicing (if you can stand it).
- Allow the bread to cool completely before storing. Store unsliced bread in a Ziploc or airtight container on the counter. If you wish, you can slice and freeze the bread as well.
I’m off for now with visions of my sandwiches dancing in my head.
Who needs sugar plums when you have soft gluten-free bread? lol
-Kate