Breadsticks, Sock Monkeys and Bananas
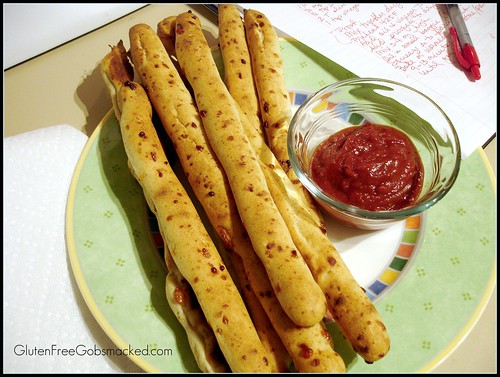
GF Breadsticks for 2, originally uploaded by Kate Chan.
Breadsticks = The Recipe
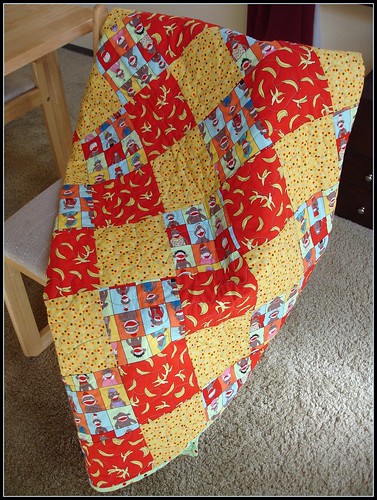
Sock Monkeys = The Quilt
Bananas? = The Writer
Life is a waiting game. Hurry and wait. Wait again.
OH! I’m not good at waiting! It’s starting to take a bit of its toll on my brain and mood (just ask my Love and my sisters!). I’m starting to feel closer to getting our little one home, after all – there is nothing more that we can do. It’s all in the hands of her Korean agency. Until they get their paperwork done, we are left waiting.
While we wait we’ve been baby-proofing (or rather adult-proofing) the house and generally tidying up the loose ends. One of the tasks I took on to help ease through this wait-time was making a quilt for her. We are going to hang it up on the wall in her room for a bit of decoration and then, when she is a little older, she can use it for her blanket.
Now, sewing….. is not a skill that I possess. I must say that straight lines in any form: drawn, sewn, cut, etc as probably the most basic skill that I don’t possess. After getting the blocks cut apart, lined up, sewn together and then over to a friend’s house for help squaring it all off (What? It’s not square after I cut all of those little squares? Huh…). I brought it to a woman who did all the stippling (stippling is my new learning – I had no idea what that was or what it was called). I got it back last week but haven’t had time to sit down and get the trim stitched on until this weekend.
My friend came over and used the sewing machine to get one side of the trim down. And then she demonstrated the type of stitch I would need to use on the back of the trim. Let’s just say that my fingertips are so incredibly tender right now that I asked my love to chop the cilantro etc for Pico de Gallo for breakfast. Oh man! I definitely know that I don’t have calluses developed, but after this weekend, I think I have a decent start.
We chose happy fabrics and colors, but once we got them all together on the quilt, we are concerned that they may be just a bit too happy. LOL We have three fabrics on front: sock monkeys, red squares with yellow bananas, and some yellow squares with multi-colored polka dots. The back fabric is the same as the trim – a light green with the same colors of polka dots as the front fabrics. And now it’s finished. Want to take a peek? Here it is:
Now that I’m done with her quilt, it means my waiting time will have to be dedicated to getting my classroom ready for a long term sub, and the nervous energy at night will be redirected into the kitchen. This means that I will probably be back to posting at least one other recipe this week beyond the breadsticks we whipped up on Friday night. (We had the best fish tacos this past week too… maybe I’ll post about those – simple and quick – good for a weeknight.). Hmm… let’s see where my energies take me in the kitchen while I wait, huh?
But you didn’t come here to listen to me prattle on, now did you?
You want the breadsticks!
You want them warm, with a bit of salt on the outside and perfect for dipping, right?
Well, good. That’s what you’re going to get!
Gluten Free Simple & Fast Breadsticks (Click here for a printable version of this recipe.)
Recipe makes 8 12″ breadsticks (1″ wide)
Ingredients:
1 teaspoon yeast
1/2 cup warm milk (or rice milk)
3/4 teaspoon honey or agave nectar
1/4 cup shredded or flaked parmesan cheese
1/2 cup sorghum flour (or rice flour or millet flour)
1/3 cup tapioca starch
1 teaspoon cornstarch
1 1/2 teaspoons powdered egg whites
1/2 teaspoon xanthan gum
1/2 teaspoon salt
2 Tablespoons olive oil (plus 1/2 teaspoon for the baggie)
1 teaspoon apple cider or rice vinegar
Directions:
- Heat milk until warm – not hot! Add agave and yeast and mix together. Set aside to proof while you mix the remaining ingredients.
- In the bowl of your mixer or a medium mixing bowl, mix together all of the dry ingredients including the parmesan cheese. (Parmesan, sorghum, tapioca, cornstarch, powdered egg whites, xanthan gum, and salt).
- Stir these dry ingredients together. (NOTE: At this point, add herbs to enhance your breadstick flavor. You can add rosemary and thyme, sun-dried tomato pieces, garlic/onion, etc.)
- Add the oil and vinegar to the dry ingredients and mix again.
- Check the proofed yeast/milk mixture. If it has risen, add this to the dry and mix together.
- Mix on medium-high for 3-4 minutes.
- Drizzle 1/2 teaspoon of olive oil into a small baggie. Smooth the outside of the baggie around to spread the oil around inside. (This prevents the dough from sticking to the bag.)
- Scrap the dough into the baggie. Snip one of the corners slightly and squeeze the dough out the corner on to a piece of parchment paper (or a silpat). Squeeze your breadsticks into long lengths and leave 1 1/2 inches in between your breadsticks to allow a little room for rising.
- Set the breadsticks aside to rise for 15 minutes. (They may not rise that much – you can add more yeast (one more teaspoon) if you want them to rise higher the next time.)
- Preheat the oven to 425F. (If you have a baking stone, place it in the oven to get hot. We use a baking stone to crisp the bottoms of our breads and crusts. You can still use parchment paper when you use a baking stone.)
- Once the oven is warm/the breadsticks have had 15 minutes to rise, lightly spritz the tops of the breadsticks with olive oil and sprinkle with salt.
- Then slide them on to the hot baking stone still on their parchment paper OR slide a pan in to the oven with your breadsticks.
- Bake for 9 – 12 minutes or until golden.
Serve with your favorite salad or dipping sauce.
These have never lasted long enough in my house for me to tell you what they taste like the next day. Sorry! Maybe one of your will have that experience and can share? 🙂
Happy MLK Day, All!
-Kate